User Guide
Build your onchain identity in Web3 with Sui Name Service (SuiNS). Using SuiNS, you can register a name (any name that is not already registered) and use it for onchain transactions.
You can use the SuiNS Dashboard link in the top nav bar to jump over to SuiNS and register some names, or configure the ones you already own.
Register names
To enjoy the benefits of SuiNS, you must first register names. When you register available names, you purchase the rights to those names for one year. After registration, you can renew your names for multiple years.
To register a name:
- Go to the SuiNS site and tap or click the name search bar to open the SuiNS search dialog. This search bar is available at the top of the site when navigating the dashboard.
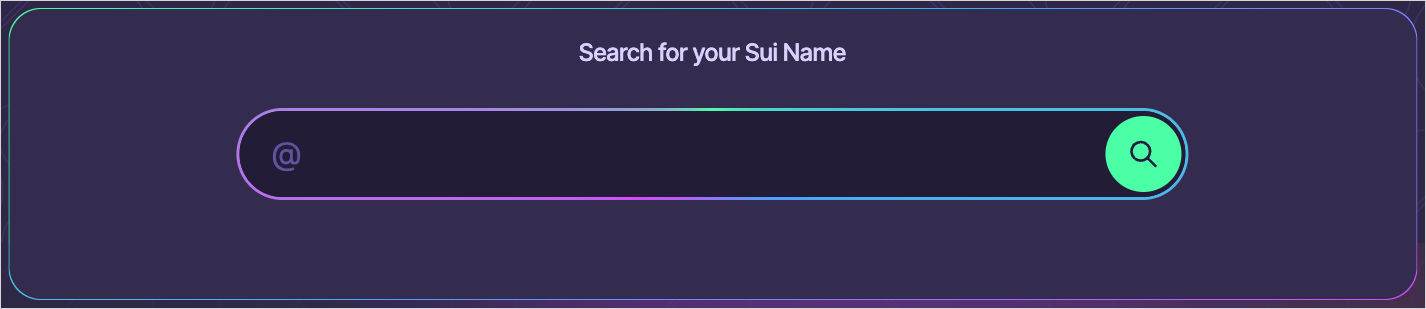
- Type a name of interest in the search field between 3 and 63 characters, inclusive. Press Enter or tap or click the magnifying glass icon to initiate the search. Search results show whether the name is available and the price in SUI for one year of registration.
- Tap or click a name to open the Register Name dialog.
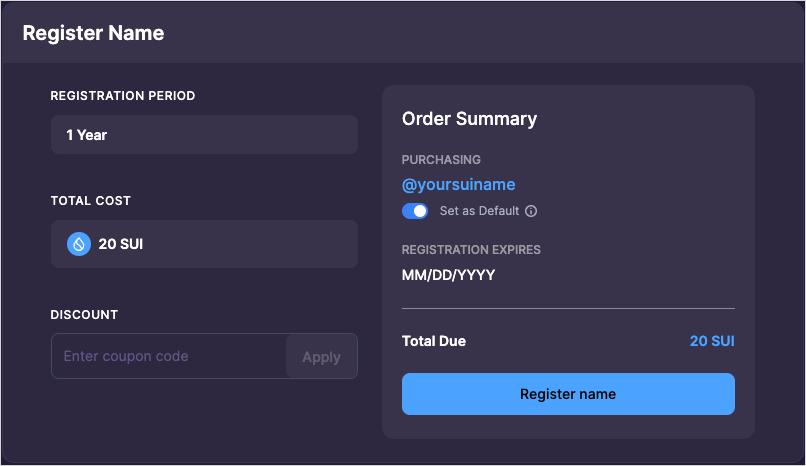
- Tap or click the Set as Default toggle to identify whether the name should be default for the address, apply a coupon code if you have one, then tap or click Register name.
- Approve the transaction using your connected wallet. If registration is successful, SuiNS opens the Names page of the dashboard. The new name appears in the list. If there is an error, fix the issue SuiNS raises and try again.
Renew names
You can renew, or extend the expiration date, for any of your registered names for up to 5 years.
To renew registered names:
- Tap or click the Connect Wallet button in the upper right.
If your wallet is already connected, your address or SuiNS name appears here instead.

- Follow the prompts to connect your Sui or Stashed Wallet, if not already connected.
- After connecting, the Connect Wallet button displays your address (or connected SuiNS default name). Tap or click the button to open the account dialog.
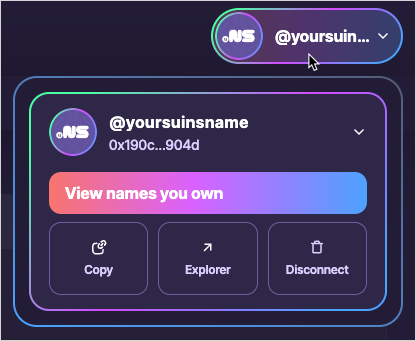
- Tap or click the View names you own button in the dialog. The Names view opens with a list of names associated with the connected account.
- Hover your cursor over or tap the icon for the name you want to change and click the ellipses (...) that appears in the upper-right corner to open the context menu for the name.
- Select Renew name from the menu to open the dialog.
- Use the Registration Period field to set the number of years to retain the rights to the name. The maximum value is 5 years minus the current registration period. So, if you just registered the name, the maximum number of years you can renew is 4. As you increase or decrease the value, SuiNS updates the amount in SUI and the registration expiration date based on the value.
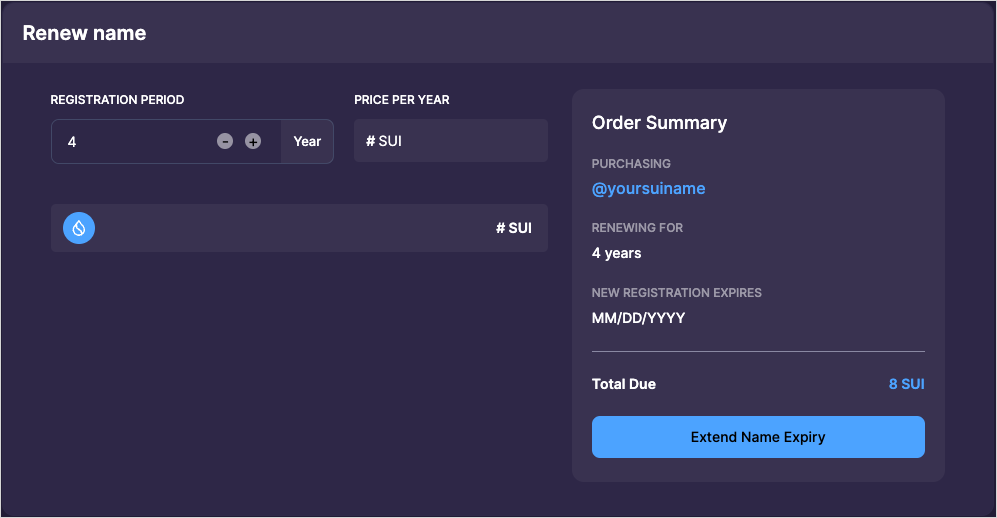
- Tap or click Extend Name Expiry button.
- Approve the transaction using your connected wallet.
Renewal grace period
When the current date surpasses the last day of your registration period, the SuiNS name expires. You have a 30-day grace period within which you can renew the registration. After that, you must register the name again, if it is available.

Update avatars
Have a special NFT that you want to represent your identity on chain? After you register a name, you can set the avatar to associate with that name.
To assign an owned NFT to your SuiNS name:
- Tap or click the Connect Wallet button in the upper right.
If your wallet is already connected, your address or SuiNS name appears here instead.
- Follow the prompts to connect your Sui or Stashed Wallet, if not already connected.
- After connecting, the Connect Wallet button displays your address (or connected SuiNS default name). Tap or click the button to open the account dialog.
- Tap or click the View names you own button in the dialog. The Names view opens with a list of names associated with the connected account.
- Hover your cursor over or tap the icon for the name you want to change and click the ellipses (...) that appears in the upper-right corner to open the context menu for the name.
- Select Personalize Avatar from the menu to open the avatar dialog.
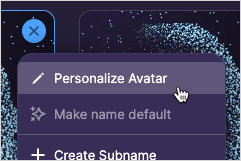
- The dialog lists the NFTs for your address. Select the one you want to use and click Update Avatar.

- Approve the transaction using your connected wallet. After the transaction completes, your avatar becomes associated with your address and appears with your SuiNS name wherever avatars are supported.

Linked address
You can change the address that your SuiNS name resolves to. The original address that registered the SuiNS name retains control over its configuration, but the name points to the address you provide.
To link an address to your SuiNS name:
- Tap or click the Connect Wallet button in the upper right.
If your wallet is already connected, your address or SuiNS name appears here instead.
- Follow the prompts to connect your Sui or Stashed Wallet, if not already connected.
- After connecting, the Connect Wallet button displays your address (or connected SuiNS default name). Tap or click the button to open the account dialog.
- Tap or click the View names you own button in the dialog. The Names view opens with a list of names associated with the connected account.
- Hover your cursor over or tap the icon for the name you want to change and click the ellipses (...) that appears in the upper-right corner to open the context menu for the name.
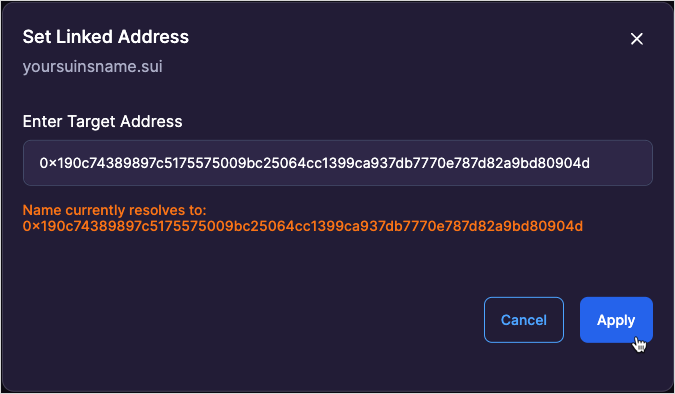
- Select Link To Wallet Address from the menu to open the Set Linked Address dialog.
- Type in the new address the name should resolve to in the Enter Target Address field. By default, the linked address is the address that registered the name. SuiNS warns you if you enter an address that has no onchain transactions.
- If you previously changed the linked address, the dialog notifies you and displays a Set your address link to quickly set the address back to the one that registered the name.
- Tap or click Apply. Alternatively, click Cancel to close the dialog without making any changes.
- Approve the transaction using your connected wallet. The address the name points to is updated, but the address that registered the name retains control of the SuiNS name and the SuiNS NFT remains in the wallet of the registered address, as well.
sui.id
Using IPFS, you can create a sui.id address connected to your SuiNS name to claim a spot on the decentralized web. The IPFS protocol enables hosting peer-to-peer static sites or media that you can associate with your SuiNS name.
You need a content identifier (CID) to map your SuiNS name to your IPFS asset. To get the CID, download and use the IPFS desktop app for your operating system.
- Open the IPFS desktop app.
- Select the FILES option from the main menu and import relevant files into IPFS.
- Tap or click the ellipses (...) for the uploaded file or folder that you want to have your sui.id name point to and select Copy CID.
- Navigate a browser to suins.io.
- Tap or click the Connect Wallet button in the upper right.
If your wallet is already connected, your address or SuiNS name appears here instead.
- Follow the prompts to connect your Sui or Stashed Wallet, if not already connected.
- After connecting, the Connect Wallet button displays your address (or connected SuiNS default name). Tap or click the button to open the account dialog.
- Tap or click the View names you own button in the dialog. The Names view opens with a list of names associated with the connected account.
- Hover your cursor over or tap the icon for the name you want to change and click the ellipses (...) that appears in the upper-right corner to open the context menu for the name.
- From the context menu, select Link to IPFS Website to open the Set IPFS CID dialog.
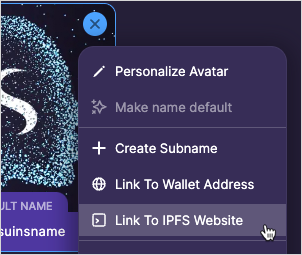
- Paste the CID copied from the earlier step into the field and tap or click Apply. Alternatively, tap or click Cancel to close the dialog without making any changes.
- Navigate your browser to
https://<YOUR-NAME>.sui.idto see your asset, being sure to change<YOUR-NAME>to your actual SuiNS name.